Well your Arduino Nano is now ready for a test run. This expansion board as a driver expansion board can be used for engraving machines 3D printersor CNC.
Arduino Nano Io Shield Sku Dfr0012 Dfrobot
Shields provide hardware controller.

. 5 I2C expansion Pin. Each Arduino IO Pin including the 5V DC and GND pins are available for easy connection to the sensors and other devices. Join 9350000 engineers with over 4850000 free CAD files Join the Community.
Now also connect the Nanos RST pin to GND. In essence it expands the Nano controller to link those devices in a simple and trouble free manner. Okay now mount it Music okay.
It is a perfect companion of Nano breadboard and compatible with both Nano v2x and v3x. Hit the upload button. Also there is no 21 mm DC jack to provide external power supply.
Select Tool Programmer Arduino as ISP. Place the grblmain folder to libraries in Arduino IDE installation directory. As you can notice the Type-B USB connector from Arduino UNO is replaced with mini-B type connector.
To program it using the Arduino IDE choose Generic ESP8266 module as your board from the menu. Wait for the Done burning bootloader message to appear. Plan to provide power using USB to mini USB cord.
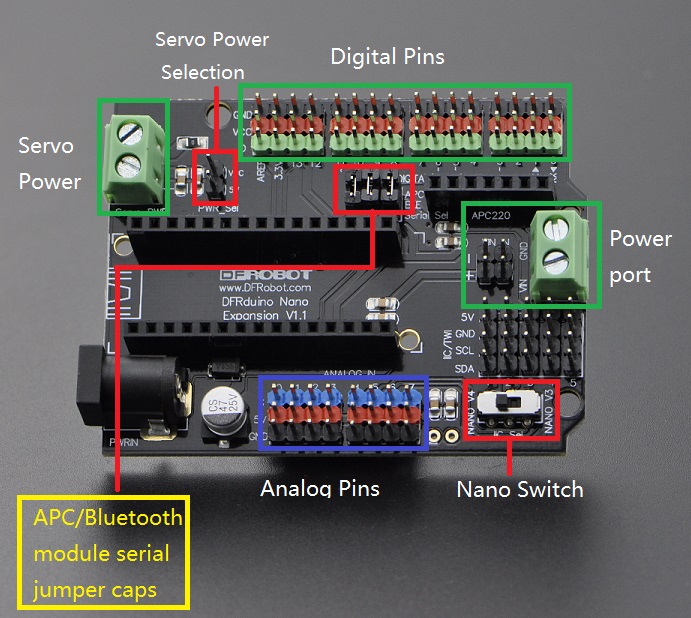
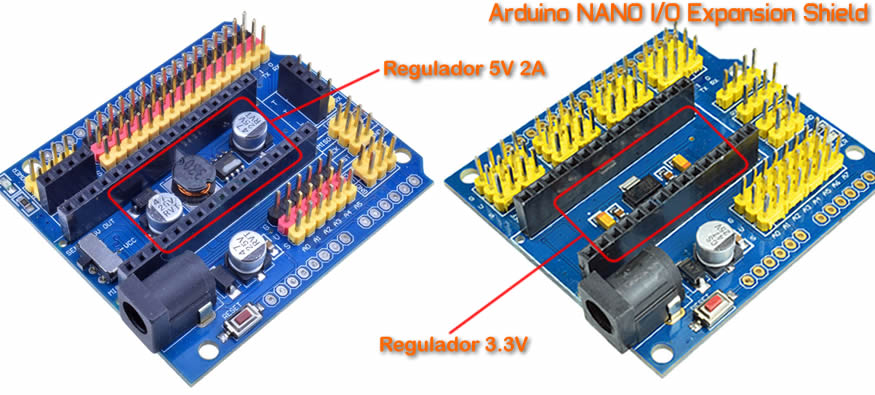
It communicates using the original STK500 protocol. The Nano Expansion Board Multi-Purpose Prototyping Shield includes a DC socket and regulator circuit allowing the Nano to be powered from an external power supply. You should get a folder named.
Optionally ACDC Outlet Power Adapter. Arduino NANO 3 Expansion board BT14-06 Dimensions measured according actual piece. It is a total of three slots can drive three A4988 stepper motor.
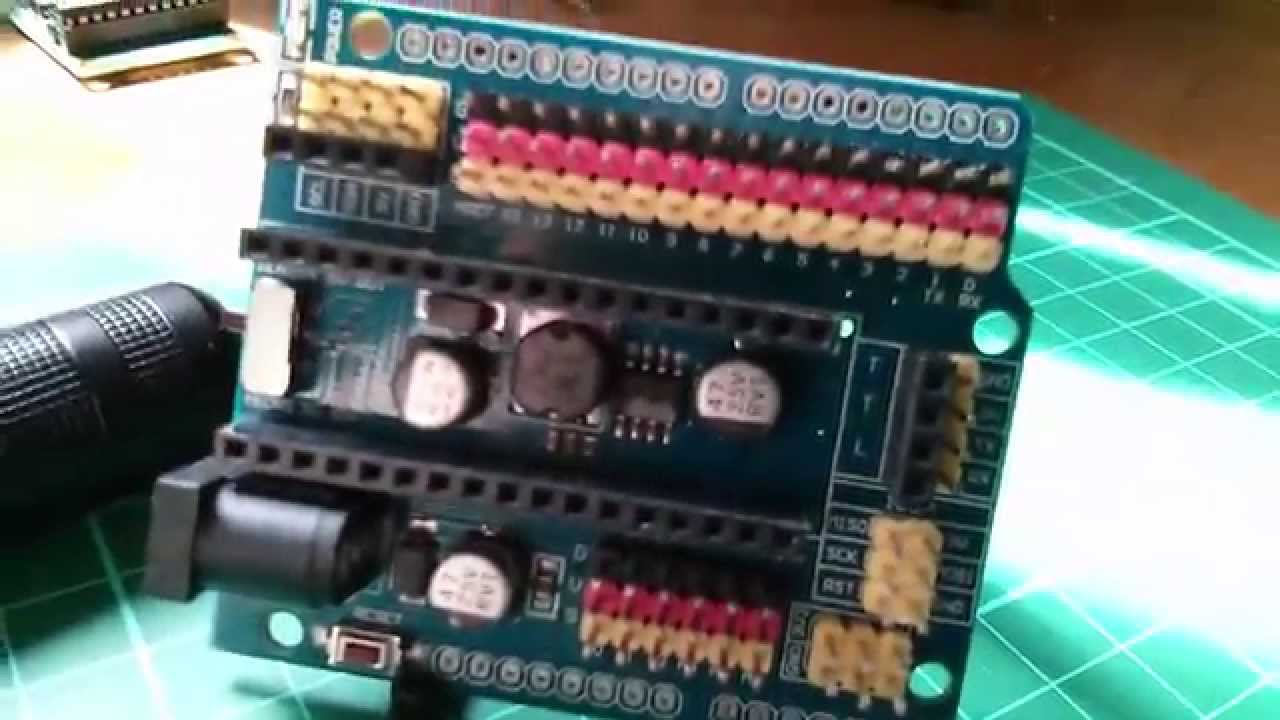
The pins can bent if you do it forcefully so press gently from the middle then gradually press from each side until its completely inserted as shown in the picture. So after mounting the arduino nano we will use this usb cable to program the arduino nano okay. 1 Servo power input.
Tips When Connecting Arduino Nano Compatible Board. 14 IO Pin servo type with GND power and signal 8 analog Pin with power output and GND. The ATmega328 on the Arduino Nano comes preburned with a bootloader that allows you to upload new code to it without the use of an external hardware programmer.
Notes about using Nano with HC-05 Bluetooth board. There are hundreds of shields out there. The board facilitates the easy connection between Arduino Nano and other devices.
It is a perfect companion of Nano breadboard and compatible with both Nano v2x and v3x. Select Tool Burn Bootloader. It provides several different.
Select Tool Board Arduino Nano. Open Arduino IDE choose File-Examples-grblmain-GRBLtoArduino youll open a grbl sample program select the port and board type burn this grbl sample program to Arduino NANO. Also make sure the USB connection is.
1 x Servo power input. Insert Arduino Nano into the Expansion Board by carefully pressing the Nano pins into the expansion boards headers. Note the picture where only half of the pins are correctly inserted.
In other words six IO ports can be well managed three stepper motors. You can connect a servo. The nano mount the arduino nano like this by giving the direction of the uh usb cable input to the this side.
Arduino Shields can be categorized into two types. Layout of Arduino Nano Board. The board enables the easy interface of many devices and sensors which includes various power voltage options.
This GPIO General Purpose Input Output pin extender provides an additional 8 pins P0 P7 which can be used to output a signal or read a signal as an inputThese modules run on the I2C bus and if daisy-chained you can connect. Be gentle when connecting the Arduino Nano compatible board to the breadboard. CNC Shield V4 Expansion Board For Arduino Nano.
The Nano is inbuilt with the ATmega328P microcontroller same as the Arduino UNO. Download the Arduino library for Nextion Display as ZIP file from the official github repository to a local folder of your choice. Here you can see that three wires are output from the servo motor which are the yellow one.
Shields provide hardware only. 2 Install Grbl Controller. Go to your download folder and unzip the zip file.
Select Arduino Duemilanove or Nano w ATmega328 from the Tools Board menu according to the microcontroller on your board. Here comes the hard part. Connect the Nano to your PCs USB port.
Each road stepper motors only need two IO ports. For arduino Nano IO Expansion Shield is specifically designed to facilitate an easy connection between for arduino Nano and many other devices. How different is Arduino Nano.
For the Nano I found it is necessary to add an external pull down resistor of 1K to the reset pin. 14 x IO pins servo type with GND power and signal 6 x PWM pins. Dimensions for pin spacing for NANO board from original A.
The IO Input Output pins of Arduno Nano are expanded out into 3-way header pin with SVG Signal Voltage Ground configuration similar to RC servo and RC receiver. Select Tool Port Select your Arduino UNO COM Port. You can also connect a lcd display by connecting it to the scl sda 5 volt ground in the same module.
It is one of the many GPIO extenders available in the marketThis tiny little board becomes a life saver When you run out of pins on your Arduino. Arduino Shields also called expansion boards are boards that can be stacked on top of the Arduino board to provide specific functionalities. So this is my arduino nano expansion adapter board io shield so you can see its design so guys uh.
So this is much helpful. Okay so you dont have to make other circuits for the cascading of the modules okay. You can wire the HC-05 Bluetooth board to auto-reset the Nano by connecting the State pin to RST through a 01 uF capacitor which works on other Arduino models such as the Pro Mini and Pro Micro.
The main difference between them is that the UNO board is presented in PDIP Plastic Dual-In-line Package form with 30 pins and Nano is. In essence it expands the Nano controller to link those devices in a simple and trouble free manner. Arduino Nano has similar functionalities as Arduino Duemilanove but with a different package.
Rename this folder to. This shield is specially designed to expand Arduino Nanos IO simplifying the connection or wiring needed to interface with external sensor or actuator.

Arduino Nano Aprendiendo Arduino

Arduino Nano Multifunction Expansion Board V3 0 Eee Box Bd Online Shop Anytime Anywhere

Arduino Nano Vs Arduino Uno Arduino Nano I2c Lcd 16x2 Youtube
Arduino Nano Tutorial Breakout Board With 2a Smps 1 Youtube
How To Run Servo Motors With Arduino Nano Expansion Adapter Board I O Shield Part 2 Youtube
Arduino Nano Shield Version 2022 Proyectos Con Arduino

Arduino Nano I O Expansion Board Project With Oled And Dht22 Sensor Youtube

Arduino Nano And Io Shield Really Basic Stuff Just How To Plug In Power To Io General Electronics Arduino Forum
0 comments
Post a Comment